NppFTP is a FTP plugin for Notepad++ to transfer files from the local desk to the remote server and vice-versa. It supports FTP, FTPS, FTPES, and SFTP communication protocol. Easy to use, just connect to a remote server from Notepad++, browse, open, edit and save the files directly on the remote server.
No need to manually ftp the files, this plugin takes care of it.
This plugin uses libssh, openssl, tinyxml, Zlib libraries. This is developed and maintained here,
Download NppFTP
Download this plugin from the official Github repository.
The current version of the plugin is v0.30.1 and it is available for 64 bit (NppFTP-x64.zip) and 32 bit (NppFTP-x86.zip) Notepad++.
You can also download Source code(zip), Source code(tar.gz), and build a plugin with MinGW-w64 or MS Visual Studio C++ compiler for windows.
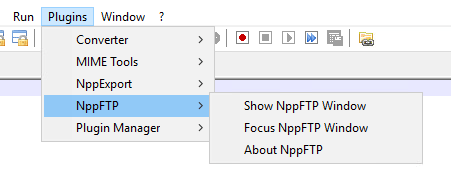
Install NppFTP Plugin in Notepad++
There are two ways to install this plugin. First, using the Plugin Manager or Plugin Admin or second manually by copying the plugins files. We are going to cover both.
Note:- You need Administrator access on the desktop to add and remove plugins.
Steps to install NppFTP plugin using the Manual Method
- Close Notepad++
- Download the plugin from the official site.
- Unzip the files to the local disk. It has NppFTP.dll and doc folder. Doc folder contains supporting files and libraries.
- Copy both doc and NppFTP.dll to C:\Program Files\Notepad++\plugins for 64 bit or C:\Program Files (x86)\Notepad++\plugins for 32 bit version.
- Open Notepad++.
The plugin should be available under Plugins–> NppFTP as shown below.
Steps to install NppFTP plugin using Plugin Admin/Manager
You can also use the Plugin Manager or Plugin Admin to install the nppFTP plugin in Notepad++. This is easy to use method to add and remove the plugin. Just verify, the plugin version is up-to-date. If it is not the latest version, use the manual method as explained above.
The interface of Plugin Admin and Manager is nearly the same with a slight difference. Below are the steps to install the NppFTP plugin using the Plugin Admin/Manager.
- Open Notepad++
- Navigate to Plugins->Plugin Admin or Plugins–> Plugin Manager -> Show Plugin Manager
- Go to the Available tab.
- Select the NppFTP plugin and click Install Button.
- Plugin Admin/manager installs the plugin and restarts the Notepad++
The plugin should be available under Plugins–> NppFTP as shown below.
Plugin Toolbar
Now let’s understand the different control options provided by this Plugin. Open Notepad++ and Navigate to Plugins->NppFTP->Show NppFTP Window.
This opens a docked window on the right hand as shown below.
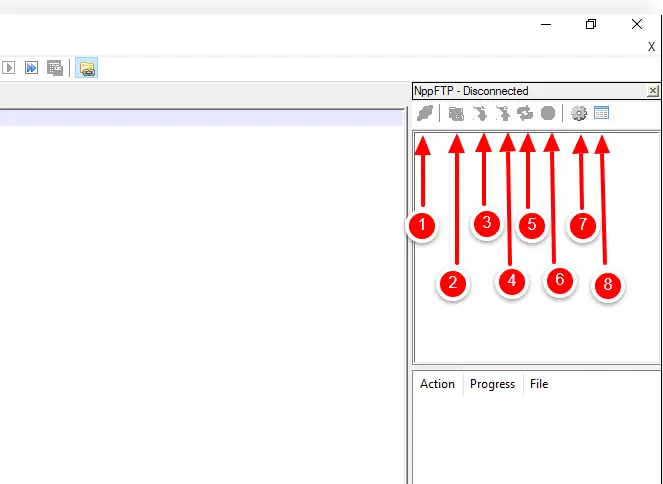
When you open NppFTP first time, all the control buttons except the setting and show message windows are disabled. Below are the control buttons.
- 1- Connect/Disconnect
- 2- open directory
- 3-Download file
- 4- upload file
- 5-refresh
- 6-Abort
- 7-Settings
- 8-show message window
Configure NppFTP Plugin
Configuration involves creating Connection settings, Authentication, FTP mode, Cache setup. Let’s discuss and understand all this NppFTP plugin configuration in the below section.
Click on the Gear icon (7-Settings) to open the settings option.
General Settings
This setting allows you to change Global Cache and Master password.
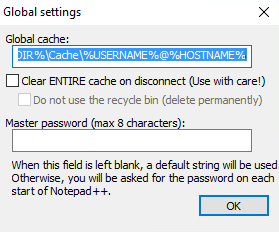
- Global Cache – This option allows you to change the Global Cache path. You can check Clear Entire cache on Disconnect if you want to clear cached files.
- Master Password – Enter the master password for the remote server here. It is optional. If not entered plugin asks for the password each time when you connect.
Profile Settings
This setting allows you to set up a connection profile. You can create named profile for a remote server connection and save preference for each connection like Hostname, Username and Password, Connection Type, Transfer Mode, Cache, etc.

Let’ see each option below in detail below.
Create a Connection Profile
First, we will see how to create a connection profile.
Click Gear icon -> Profile settings to launch the below window. There are total 5 setup tabs.
Connection
Click Add new button. This opens a small popup window. Enter connection profile name e.g TEST. Use Rename, Copy and Delete button to modify connection profiles.
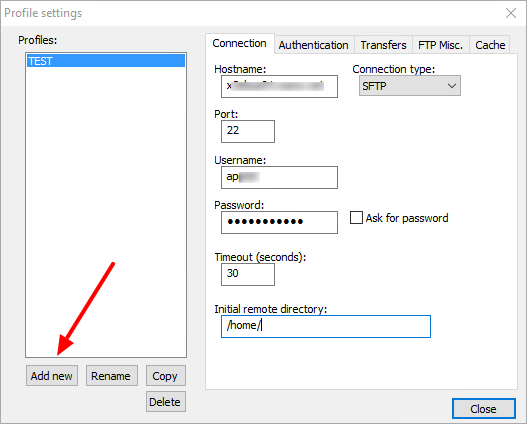
Then enter all necessary connection information as shown.
- Hostname – e.g test.atechtown.com
- Connection Type – FTP, sFTP, FTPES(explicit), FTPS(implicit)
- Port – Auto populated based on the connection type
- Username
- Password
- Timeout(Seconds) – default is 30
- Initial Remote Directory – e.g /home/
Authentication
This controls how you connect to a remote server.
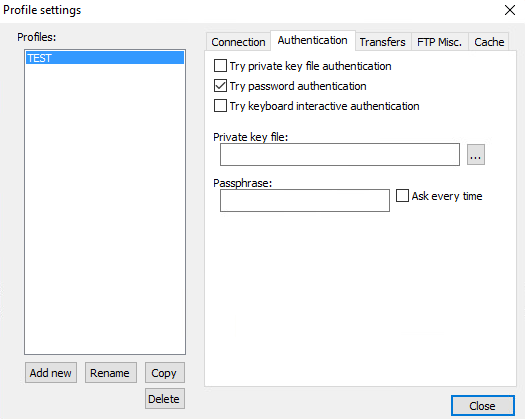
- Try private key file authentication
- Try password authentication
- Try keyboard-interactive authentication
When you select private key file authentication, you need to browse and select a private key file and enter passphrase if any.
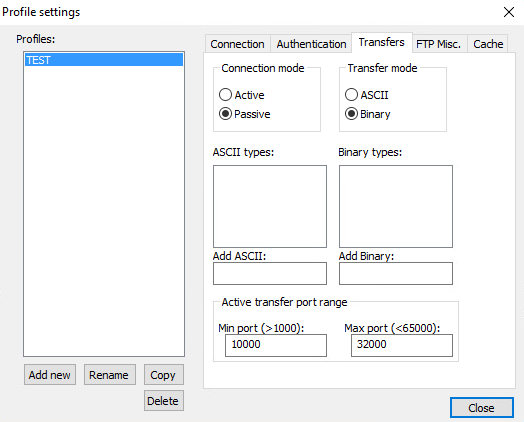
Transfer
This allows top setup transfer mode like active/passive, ASCII or Binary.
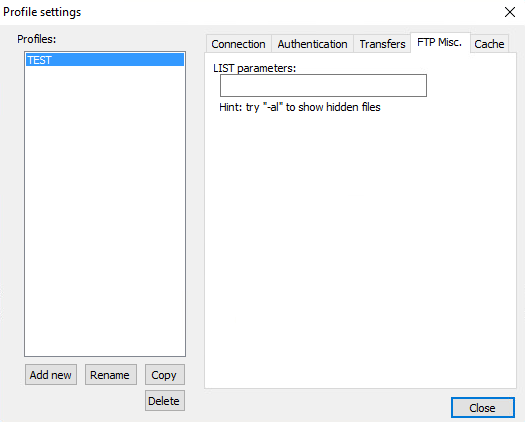
FTP Misc
You can provide an option to – al to show hidden file
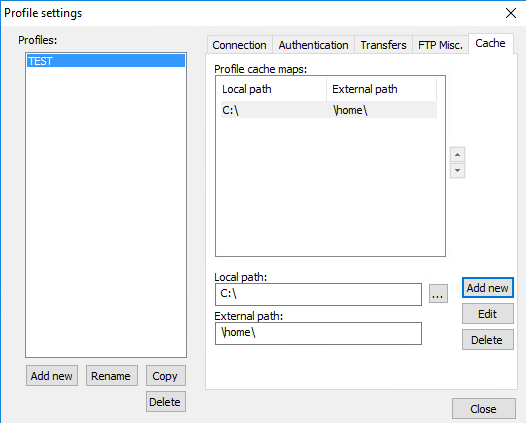
Cache
Set up the path where this plugin caches the file at the local server. This maps the local directory with a remote directory.
When you edit the file, the file gets downloaded to the local directory. When the local file is saved, NppFTP uploads that file to a respective external directory.
Enter Local Path and External path and click Add New button to create profile cache maps. You can create multiple cache maps for a single connection. There is a really nice article which explains how it works.
Using NppFTP Plugin
Now let me show you how to use the NppFTP Plugin. Below are the generic steps,
- Open Notepad++
- Launch NppFTP Plugin
- Connect to the remote server
- Open directory and double click on file to edit
- Edit file
- Save the file in Notepad++
This automatically uploads the file to the remote server. No need to separately FTP file, the plugin takes care of it.
Summary
There are many free and paid FTP software available like FileZilla, WinScp. But, NppFTP is a good addition to Notepad++ if you are using it as the main editor. You can just connect and edit files on the remote server itself.
Do let me know if you are using this plugin and finding it useful?