
Why you need a plugin manager for Notepad++ in the first place?
Notepad++ text editor supports plugin to extend base functionality. There are many useful plugins developed by developers across the world e.g compare, combine, etc. Although you can install each plugin manually, it would be difficult for the new user. Plugin Manager makes plugin management easy.
Notepad++ plugin manager
Notepad++ plugin manager is a plugin for Notepad++ which allows you to Install, Update, and Uninstall Plugins. It eases the plugin management.
Below are some of the feature and functionality provided by the Plugin Manager,
- Install, Update and Remove all existing plugins along with supplemental files as well as the plugin file itself (e.g. config, doc, extra libraries)
- Notify when an update for an installed plugin is available, and allow the user to update directly. Users can ignore the updates.
- Automatically manage dependencies between plugins
- Automatic installation of the correct version (ANSI/Unicode) for your Notepad++
- Validation of DLLs copied, against a central list of valid files. This slightly mitigates the risk of automatically downloading updates.
- Plugin Manager is able to update itself and will notify the user when an update is available
- Proxies are supported.
- The local plugin list file is only downloaded when something has changed – the MD5sum of the file is compared to the server’s version, and if it is different, then a new copy is downloaded.
Refer official page for further details.
You may find the Notepad++ plugin manager missing if you install Notepad++ version 7.5 and onward. The new version of Notepad++ comes with an in-built manager called Plugin Admin.
What if you still want to install and use an old plugin manager?
Simple, install it.
Install Plugin Manager in Notepad++
You can easily install the Plugin Manager in Notepad++ using the manual plugin installation method, as plugin manager itself is a Plugin.
Let’s see how to do that,
- Download Plugin Manager from Official Page.
- Create folder PluginManager under C:\Program Files (x86)\Notepad++\plugins for 32 bit and C:\Program Files\Notepad++\plugins for 64 bit Notepad++
- Copy PluginManager.dll to this folder
- Restart Notepad++
Plugin manager should be visible under Plugins Menu as shown in the below image.
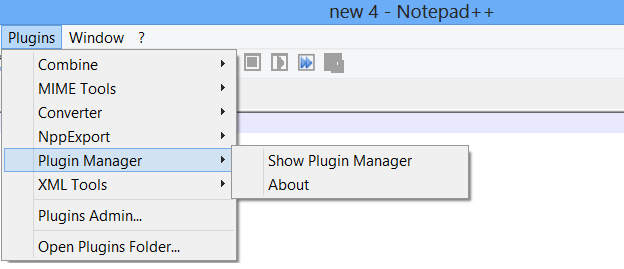
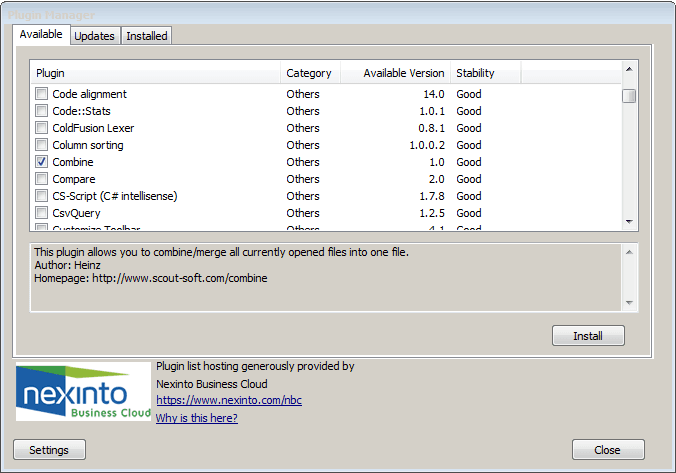
Click Plugins->Plugin Manager-> Show Plugin Manager to open it. GUI is very simple (shown below) with 3 tabs Available, Updates, and Installed.
Let’s discuss each in brief.
- Available – This tab list down all the plugins available for Notepad++. It shows information like Plugin, Category, Available Version, Stability. By default, it shows plugins which are stable and good. If you want to see unstable plugins just click on the setting and click on the Show Unstable Plugin checkbox.
- Updates – This shows the plugins list which has updates available. It shows plugin, Category, Installed version, Available version, and Stability information. You can select the plugin which you want to update and click the update button. Here also you can update multiple plugins at once.
- Installed – This shows the list of plugins that are installed. It shows Plugin, Category, Installed version, and Stability information. You can use this to reinstall or remove it. Just select the plugin and click on the respective button to reinstall or remove the plugin.
Settings
This allows you to change the setting for the plugin manager. You can setup below option,
- Notify of plugin updates at startup
- Check for plugin updates for every xx days
- Show unstable plugin
- Install Plugin for all user
- Force HTTP instead of HTTPS for downloading plugin list
- Use Development plugin list(many contain untested, unvalidated or uninstallable plugin)
Using Plugin Manager to Install, Update and remove plugins
Installation of Notepad++ Plugins using Plugin Manager is very easy. Just select the plugin and click Install Button. You can even select multiple plugins at once for installation. The manager downloads the respective plugin from the repository and installs it. You need to restart the notepad++ to see the plugin under the plugins menu.
Install Plugin
- open Notepad+ and navigate to Plugin->Plugin Manager->show plugin manager
- Go to the Available tab
- Search for the required plugin
- Click install
Update Plugin
- open Notepad+ and navigate to Plugin->Plugin Manager->show plugin manager
- Go to the Update tab
- Search for the required plugin
- Click update
Remove/reinstall Plugin
- open Notepad+ and navigate to Plugin->Plugin Manager->show plugin manager
- Go to the Install tab
- Search for the required plugin
- Click the reinstall or remove button
Sometimes plugin manager cannot install the plugin. In that case, you need to manually install the plugin. Check this article How to Install Plugin in Notepad++ for step by step instruction.